VF

Victor Frye
Your friendly neighborhood developer
.NET Aspire is a new framework for building cloud-native and distributed applications. It brings a host of key features as I've previously discussed, but my two favorites are the ability to model your application stack in C# code and the instant local development environment you get after doing so.
In this post, I'll explore these features through two sample applications: a classic CRUD application with containerized backing services and an AI prototype that relies on cloud services. Both showcase how Aspire solves the complexity of running distributed applications locally. You can find the code for these examples on GitHub at victorfrye/crudcounter and victorfrye/mockingmirror.
To start modeling our application, we need an Aspire app host project. This is a .NET project that uses the Aspire SDK to define the resources and integrations needed for our application. I cover how to add an Aspire app host project in my command line guide.
Here I'll show you two app host projects. Two files make up the core of the Aspire app host: a Program.cs file and a .csproj file. These can be extended to your pleasure, but these two files are the current minimum. The csproj file will provide our SDK and hosting integration package references, while the Program.cs will be the C# code for modeling and serve as the entrypoint for our local application going forward.
First, the csproj file for our CRUD application host looks like this:
<Project Sdk="Microsoft.NET.Sdk">

  <Sdk Name="Aspire.AppHost.Sdk" Version="9.3.0" />

  <PropertyGroup>
    <OutputType>Exe</OutputType>
    <TargetFramework>net9.0</TargetFramework>
    <ImplicitUsings>enable</ImplicitUsings>
    <Nullable>enable</Nullable>

    <AssemblyName>VictorFrye.CrudCounter.AppHost</AssemblyName>
    <RootNamespace>VictorFrye.CrudCounter.AppHost</RootNamespace>

    <UserSecretsId>2bad5002-9943-41cd-9a77-ec579ba4a680</UserSecretsId>
  </PropertyGroup>

  <ItemGroup>
    <PackageReference Include="Aspire.Hosting.AppHost" Version="9.3.0" />
    <PackageReference Include="Aspire.Hosting.NodeJs" Version="9.3.0" />
    <PackageReference Include="Aspire.Hosting.Redis" Version="9.3.0" />
    <PackageReference Include="Aspire.Hosting.SqlServer" Version="9.3.0" />
  </ItemGroup>

  <ItemGroup>
    <ProjectReference Include="..\WebApi\WebApi.csproj" />
  </ItemGroup>

  <Target Name="RestoreNpm" BeforeTargets="Build" Condition=" '$(DesignTimeBuild)' != 'true' ">
    <ItemGroup>
      <PackageJsons Include="..\WebClient\package.json" />
    </ItemGroup>

    <!-- Install npm packages if node_modules is missing -->
    <Message Importance="Normal" Text="Installing npm packages for %(PackageJsons.RelativeDir)"
      Condition="!Exists('%(PackageJsons.RootDir)%(PackageJsons.Directory)/node_modules')" />
    <Exec Command="npm install" WorkingDirectory="%(PackageJsons.RootDir)%(PackageJsons.Directory)"
      Condition="!Exists('%(PackageJsons.RootDir)%(PackageJsons.Directory)/node_modules')" />
  </Target>

</Project>
There are four callouts here:
Sdk element specifies we are using the Aspire SDK for this project. This extends our .NET SDK for Aspire app hosting capabilities.ProjectReference element includes a reference to my existing ASP.NET Core Web API project. Aspire integrates seamlessly with other .NET projects.PackageReference item group includes a mix of dependencies for hosting our various services, e.g. Node.js for the web client, Redis for caching, and SQL Server for our database.RestoreNpm target, a nasty bit of build magic that I'm using to ensure all npm packages are installed for the web client for first-time repository runs.You could get away with only the Sdk element, but why reinvent the wheel? Referencing existing .NET projects is commonplace in the ecosystem already. You could build your own resource models, but prebuilt packages from Microsoft are less work and at this stage we probably don't even know how. Finally, that RestoreNpm target is a huge convenience for our end-goal: a single step to run our entire application.
Okay, but what about the actual C# code? Let's look at the Program.cs file now:
var builder = DistributedApplication.CreateBuilder(args);

var sql = builder.AddSqlServer("sql")
                 .AddDatabase("db");

var cache = builder.AddRedis("cache");

var api = builder.AddProject<Projects.WebApi>("api")
                 .WithReference(sql)
                 .WaitFor(sql)
                 .WithReference(cache)
                 .WaitFor(cache)
                 .WithHttpHealthCheck("/alive")
                 .WithExternalHttpEndpoints();

builder.AddNpmApp("client", "../WebClient", "dev")
       .WithReference(api)
       .WaitFor(api)
       .WithEnvironment("NEXT_PUBLIC_API_BASEURL", api.GetEndpoint("https"))
       .WithHttpEndpoint(env: "PORT");

await builder.Build().RunAsync();
This code models our entire application stack in a few lines:
Without Aspire, this would require multiple manual steps: starting containers, launching the API, configuring the frontend with the right API URL, and hoping everything connects correctly.
With Aspire, we do it in a single step in three forms: press F5 in your IDE, run dotnet run --project "Path/To/MyAspireApp.AppHost" in your terminal, or aspire run with the Aspire CLI.
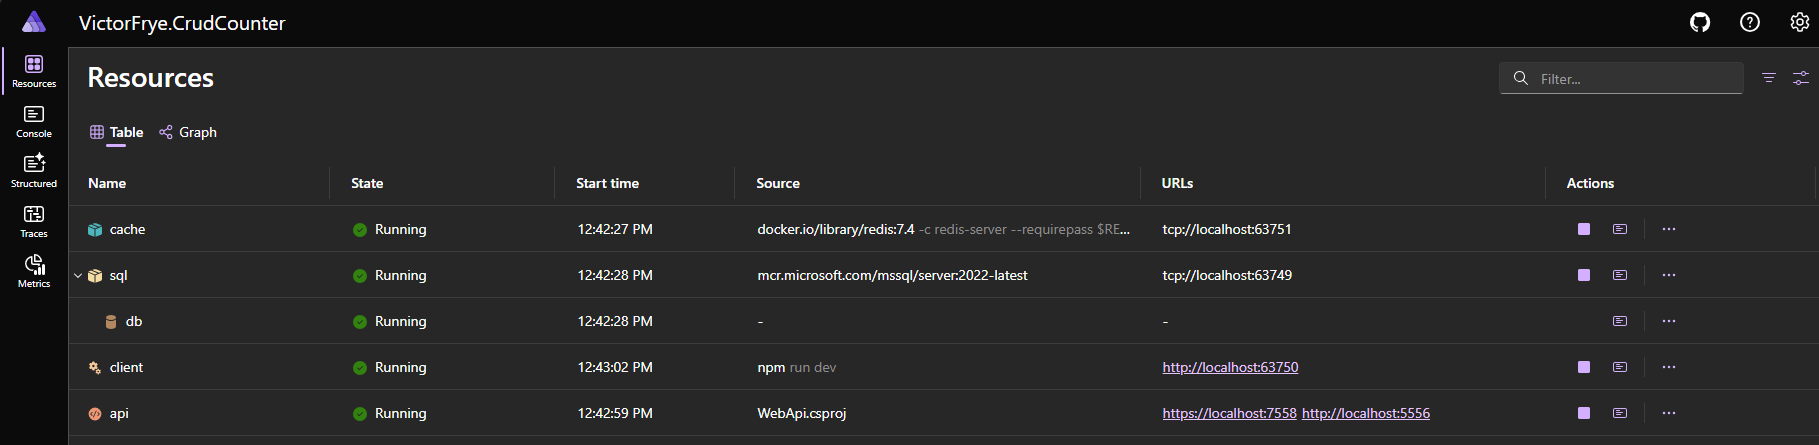
If you chose to install the Aspire CLI and run that way, you are greeted with a beautiful output like this:
Dashboard:
📈  https://localhost:17280/login?t=af9ee87cf516605f0639052a6731c2d0

╭──────────┬───────────────────────────┬─────────┬────────────────────────╮
│ Resource │ Type                      │ State   │ Endpoint(s)            │
├──────────┼───────────────────────────┼─────────┼────────────────────────┤
│ api      │ Project                   │ Running │ https://localhost:7558 │
│          │                           │         │ http://localhost:5556  │
│ cache    │ Container                 │ Running │ tcp://localhost:60771  │
│ client   │ Executable                │ Running │ http://localhost:60772 │
│ db       │ SqlServerDatabaseResource │ Running │ None                   │
│ sql      │ Container                 │ Running │ tcp://localhost:60773  │
╰──────────┴───────────────────────────┴─────────┴────────────────────────╯
Press CTRL-C to stop the app host and exit.
Regardless of using the Aspire CLI or not, you will see a dashboard in your terminal or pop out in your browser. This is the Aspire dashboard, which provides a web portal to your local environment with a resource table or graph, console logs for each, traces for requests between resources, and stateful information about each resource.
Okay, but what if not everything is local? Well let's look at the AI sample now.
First, the csproj file for our AI application host looks like this:
<Project Sdk="Microsoft.NET.Sdk">

  <Sdk Name="Aspire.AppHost.Sdk" Version="9.3.0" />

  <PropertyGroup>
    <OutputType>Exe</OutputType>
    <TargetFramework>net9.0</TargetFramework>
    <ImplicitUsings>enable</ImplicitUsings>
    <Nullable>enable</Nullable>

    <AssemblyName>VictorFrye.MockingMirror.AppHost</AssemblyName>
    <RootNamespace>VictorFrye.MockingMirror.AppHost</RootNamespace>

   <UserSecretsId>353d8321-8cea-41fd-b09b-0503c184b4c8</UserSecretsId>
  </PropertyGroup>

  <ItemGroup>
    <PackageReference Include="Aspire.Hosting.AppHost" Version="9.3.0" />
    <PackageReference Include="Aspire.Hosting.Azure.CognitiveServices" Version="9.3.0" />
    <PackageReference Include="Aspire.Hosting.NodeJs" Version="9.3.0" />
  </ItemGroup>

  <ItemGroup>
    <ProjectReference Include="..\WebApi\WebApi.csproj" />
  </ItemGroup>

  <Target Name="RestoreNpm" BeforeTargets="Build" Condition=" '$(DesignTimeBuild)' != 'true' ">
    <ItemGroup>
      <PackageJsons Include="..\WebClient\package.json" />
    </ItemGroup>

    <!-- Install npm packages if node_modules is missing -->
    <Message Importance="Normal" Text="Installing npm packages for %(PackageJsons.RelativeDir)"
      Condition="!Exists('%(PackageJsons.RootDir)%(PackageJsons.Directory)/node_modules')" />
    <Exec Command="npm install" WorkingDirectory="%(PackageJsons.RootDir)%(PackageJsons.Directory)"
      Condition="!Exists('%(PackageJsons.RootDir)%(PackageJsons.Directory)/node_modules')" />
  </Target>

</Project>
Very similar to the CRUD app with the SDK, package references, project references, and a custom target. The main difference is the Aspire.Hosting.Azure.CognitiveServices package reference, which provides the Azure AI services we will be using. And the Program.cs? This gets a bit different:
var builder = DistributedApplication.CreateBuilder(args);

var oaiName = builder.AddParameter("OpenAIName");
var oaiResourceGroup = builder.AddParameter("OpenAIResourceGroup");
var oaiModel = builder.AddParameter("OpenAIModel");
var speechKey = builder.AddParameter("SpeechKey", secret: true);
var speechRegion = builder.AddParameter("SpeechRegion");

var openai = builder.AddAzureOpenAI("openai")
                    .AsExisting(oaiName, oaiResourceGroup);

var api = builder.AddProject<Projects.WebApi>("api")
                 .WithReference(openai)
                 .WaitFor(openai)
                 .WithEnvironment("ChatClientSettings__DeploymentName", oaiModel)
                 .WithEnvironment("SpeechClientSettings__ApiKey", speechKey)
                 .WithEnvironment("SpeechClientSettings__Region", speechRegion)
                 .WithHttpHealthCheck("/alive")
                 .WithExternalHttpEndpoints();

builder.AddNpmApp("client", "../WebClient", "dev")
       .WithReference(api)
       .WaitFor(api)
       .WithEnvironment("NEXT_PUBLIC_API_BASEURL", api.GetEndpoint("https"))
       .WithHttpEndpoint(env: "PORT")
       .WithExternalHttpEndpoints();

await builder.Build().RunAsync();
In this example, we model external cloud services that can't run locally. We use parameters to extract variables, such as API keys and Azure resource information, from local configuration stores. We use the AsExisting to reference pre-provisioned Azure OpenAI resources with an existing Aspire hosting integration. For Azure AI Speech which does not have an Aspire integration, we simply pass the parameter values as environment variables. This approach connects our web API to backing Azure AI services while still allowing us the convenience of Aspire local orchestration.
There's a lot to consume here, but the key takeaway is you have options. Regardless of whether your local environment is fully isolated or has external dependencies, regardless of if your external dependencies have packages for them already or not, you can start to model out your application with Aspire and we get the same benefits as that CRUD application: we can start up what is needed locally with a single step. Again, I pick aspire run:
Dashboard:
📈  https://localhost:17244/login?t=e5f80d45a566a13a40755d0154e1d410

╭─────────────────────┬───────────────────────────┬─────────┬────────────────────────╮
│ Resource            │ Type                      │ State   │ Endpoint(s)            │
├─────────────────────┼───────────────────────────┼─────────┼────────────────────────┤
│ api                 │ Project                   │ Running │ https://localhost:7034 │
│                     │                           │         │ http://localhost:5170  │
│ client              │ Executable                │ Running │ http://localhost:63526 │
│ openai              │ AzureOpenAIResource       │ Running │ None                   │
│ openai-roles        │ AzureProvisioningResource │ Running │ None                   │
│ OpenAIModel         │ Parameter                 │ Unknown │ None                   │
│ OpenAIName          │ Parameter                 │ Unknown │ None                   │
│ OpenAIResourceGroup │ Parameter                 │ Unknown │ None                   │
│ SpeechKey           │ Parameter                 │ Unknown │ None                   │
│ SpeechRegion        │ Parameter                 │ Unknown │ None                   │
╰─────────────────────┴───────────────────────────┴─────────┴────────────────────────╯
Press CTRL-C to stop the app host and exit.
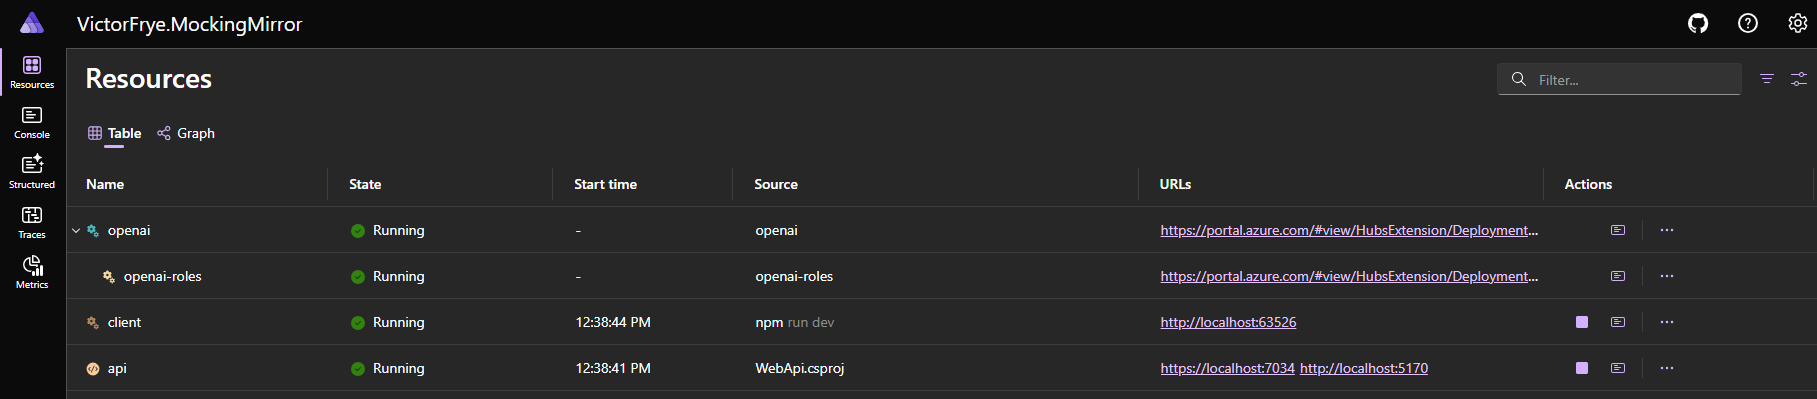
Our dashboard still gives us a portal to interact with our local environment and states of resources. I get extra information for the Azure OpenAI service as I was able to use an existing hosting integration, despite re-using an existing service. For the Speech service, I don't have to configure anything extra for other projects and can just target the configuration for the AppHost project. My backend and frontend still benefit entirely from the Aspire dashboard and my application is up and running with the press of a button.
The Aspire parameters and Azure configuration use the options pattern to bind values from configuration sources. The parameters use the Parameters section of your configuration sources, such as app settings, user secrets, or environment variables, while the Azure configuration uses the Azure section. For more on these specifically, you can refer to the Aspire documentation on external parameters and Azure local provisioning.
So now we have two different kinds of applications modeled in Aspire, one fully local and one with external dependencies. Both of these applications can be run with a single command, aspire run, and provide a dashboard to interact with them. Cool, right?
This modeling approach aligns perfectly with how we think about our applications, both locally and in deployment. The Aspire app host serves as a bill of materials for our application, defining all integrations and parameters needed to run.
The immediate benefit is a dramatically improved developer experience. New team members can clone the repository, run a single command (aspire run), and have a functional environment without learning setup procedures for each component. When you add new services to your stack, just update the model.
This pre-modeled environment also serves as an integration testing foundation. The Aspire.Hosting.Testing package lets you run your application host in test frameworks like xUnit or MSTest, enabling tests that validate your entire stack or specific components.
Beyond the inner loop, Aspire is addressing deployment scenarios by generating infrastructure as code for Bicep, Terraform, Kubernetes, and more based on your application model with publishers.
The service defaults were what drew me to Aspire initially, but my interest quickly evolved into excitement about the transformative developer experience it offers. The simplicity of modeling your application and running it locally with a single command changes expectations for development inner loop.
All of my projects, including pure JavaScript apps like this blog, now run with Aspire because it's become my new standard. I encourage you to try it in your projects and experience how it reshapes your workflow. This feels like the future of .NET development, and I'll continue exploring Aspire's capabilities in future posts.