VF

Victor Frye
Your friendly neighborhood developer

The Aspire dashboard is your home for local development when building with Aspire. It provides a centralized view of all your modeled services, their health, endpoints, and logs. By default, the dashboard provides a functional experience. But we can make it cozier with some out-of-the-box customizations. In this post, I'll walk through how to customize both the endpoint URLs and the service icons to make your Aspire dashboard feel a bit more like home.
When you start up your app host with Aspire, you are greeted with the Aspire dashboard. This provides a wealth of information, but upfront is the resource table listing all your modeled services. The number of resources will vary based on your application, but for this post, we will use only one: a static web client. The methods for customizing the dashboard remain the same regardless of the number of services.
By default, the Aspire dashboard uses icons based on resource type and displays URLs based on the endpoints you configured. Given the following simple app host program.cs:
var builder = DistributedApplication.CreateBuilder(args);

builder.AddNpmApp("client", "../WebClient", "dev")
       .WithHttpEndpoint(env: "PORT")
       .WithExternalHttpEndpoints();

await builder.Build().RunAsync();
This will produce a resource table similar to the following:
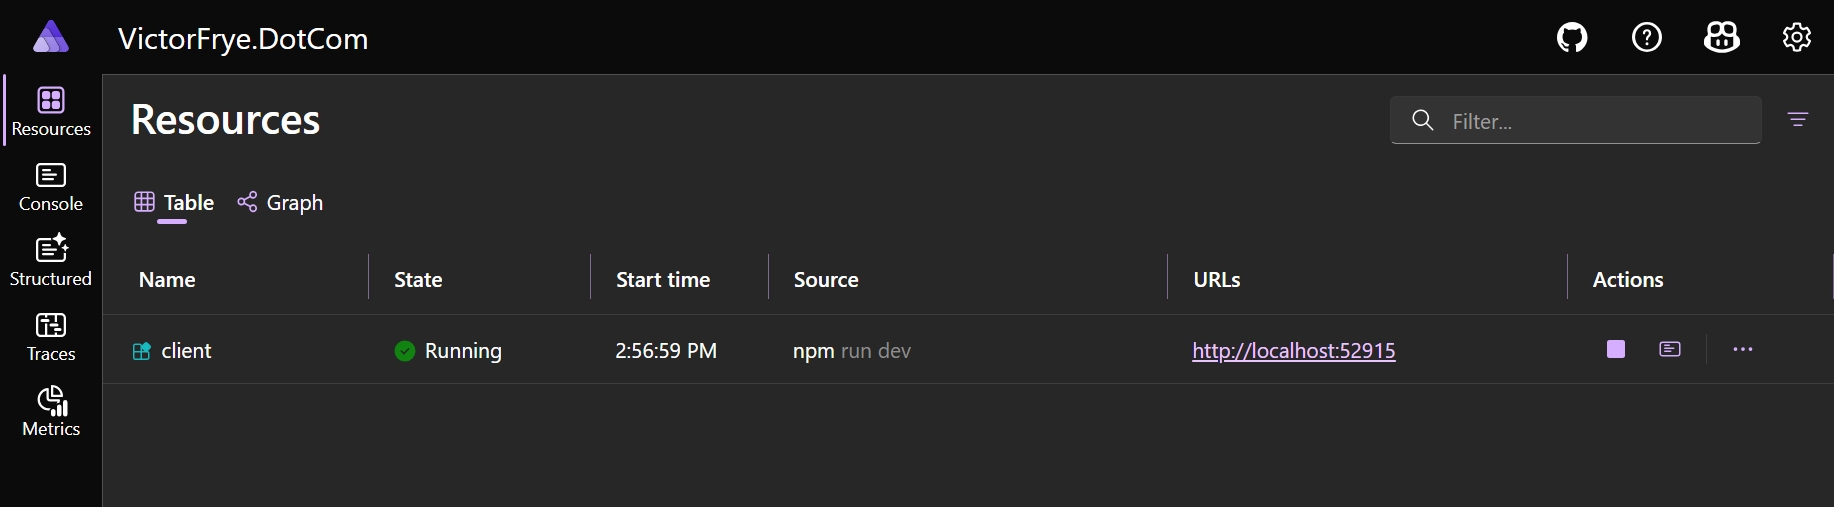
Here, we see our table row for the client service. The icon is a generic executable icon since we are using the NPM app resource type. The URL is plain and literal for the HTTP endpoint we configured. This is far from cozy! Let's fix that.
Under the hood, the Aspire dashboard uses Fluent UI design system by Microsoft. With the addition of a new method on the resource builders, we can specify any existing Fluent UI icon to use for our resource. That new method is the WithIconName() method. This method takes an iconName parameter that corresponds to the name of the Fluent icon to use. For a list of all available icons, check out the Fluent UI Icons catalog.
![]()
In my case, this is my personal website and I always think of globes when I think of websites. So, I decide to search for "globe" in the catalog and find a plethora of system icons related to globes. I am fairly familiar with this catalog so I already know what I am looking for, but if you are new to Fluent UI, take your time browsing the catalog to find an icon that resonates with you. Icons are commonly named in the format: <iconName><iconVariant> with icon names being literal metaphors for the shape and not the functionality. This means you may have to try a few different names to find out that perfect icon. The iconVariant is the suffix for all icons and can be Regular, Filled, and Color. The regular and filled options can be provided as a second enumerated parameter to the WithIconName() method. The color variant is not currently supported, though may be an option in the future. By default, the filled variant is used if none is specified.
So, I decide to use the Globe icon and keep the default filled variant. I update my app host code as follows:
var builder = DistributedApplication.CreateBuilder(args);

builder.AddNpmApp("client", "../WebClient", "dev")
       .WithIconName("Globe")
       .WithHttpEndpoint(env: "PORT")
       .WithExternalHttpEndpoints();

await builder.Build().RunAsync();
This produces the following updated dashboard:
![]()
Now, our client service has a globe icon! This is already feeling cozier. It also has functional benefits as I can quickly identify my web client service in the dashboard. It's less important with only one resource, but if you have multiple services with the same resource type, you will appreciate the visual distinction.
It also is much more distinguishable when looking at the graph view of resources:
![]()
The graph view is especially useful when checking out our dependency relationships of all modeled services. Our sample application is simple, but in a more complex application, this view becomes invaluable. The custom icons help make it even clearer.
When you add endpoints to your modeled services, or even by default the endpoints exposed, Aspire will render the literal URLs in the dashboard. For an ASP.NET Core Web API, you might see an http URL and an https URL. For our NPM app, we see just the http URL that our npm command is serving the dev server on. I'm using dynamic ports, so the port number is not predictable and the URL quickly shows me the port. It's also a link, so I can quickly click it to open the client in my browser. This also means I never care about the actual port number. I just want to open my client. I also have three major pages in my web client: home at /, my resume at /resume, and a blog you may be reading at /blog. It would be really nice if I could quickly open to any of these pages with short hyperlinks. Fortunately, Aspire provides a way to do this with the WithUrlForEndpoint() method.
Aspire has two different constructs at play here: URLs and endpoints. An endpoint is named and may be configured by the resource type itself. Each endpoint may have one or more URLs associated with it. By default, Aspire will create URLs based on the actual listening addresses of the endpoints. However, with the WithUrlForEndpoint() method, we can add additional URLs for any endpoint. This method takes two parameters: the endpointName and a callback to configure the URL. The endpointName is the name of the endpoint to add the URL for. In our case, we only have one HTTP endpoint, so we can use the default name of http. The callback provides the EndpointReference that we can use to configure the URL or ignore and add more URLs. Let's add three URLs for our three main pages in the web client. We can update our app host code as follows:
var builder = DistributedApplication.CreateBuilder(args);

builder.AddNpmApp("client", "../WebClient", "dev")
       .WithIconName("Globe")
       .WithHttpEndpoint(env: "PORT")
       .WithUrlForEndpoint("http", static url => url.DisplayText = "🏠 Home")
       .WithUrlForEndpoint("http", static _ => new()
        {
            Url = "/resume",
            DisplayText = "💼 Resume"
        })
        .WithUrlForEndpoint("http", static _ => new()
        {
            Url = "/blog",
            DisplayText = "✏️ Blog"
        })
        .WithExternalHttpEndpoints();

await builder.Build().RunAsync();
Our URLs are relative and have the property of Url and DisplayText. The Url is the relative URL from the endpoint. The DisplayText is optional and determines what is shown in the dashboard. This allows us to use emojis or friendly names for our URLs. After updating our code, we get the following dashboard:
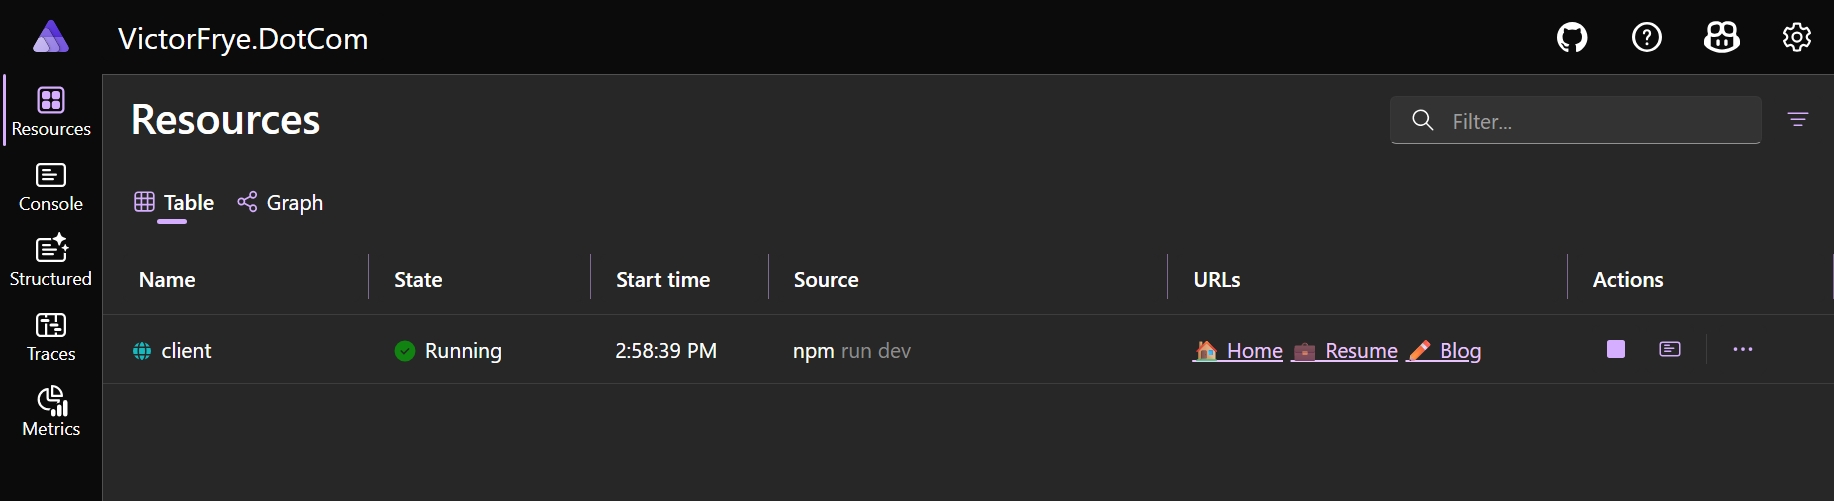
Now, our Aspire dashboard feels a bit more like home. We have a friendly globe icon for our web client service and three quick links to our main pages with emojis to make them stand out. This makes local development with Aspire even more enjoyable. It also serves to make it easier to work with my application through visual cues and important links. I recommend adding these customizations to your aspirified applications to help your team develop faster and with more joy. Happy aspirifying!